Grab Our Blinkie

Featured Store

Scriptz R Us
Featured Artist

Arthur Crowe
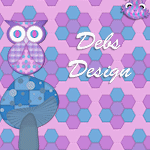
Featured Designer

Debs Design
Featured Tutorials

Devious Desires


Gifts
These gorgeous CU4CU Fall Papers are free just for you and
kindly offered by oneof our Sponsors Nette's NightOwl Works
You can get them Here

Gifts
Check out this fabulous freebie from our Featured Designer Scrappin With Lil Ole Me
You can get this gorgeous lil Pup Here

Gifts
Check out the gifts just for you from some of our sponsors and friends!
More will be posted throughout the edition so be sure to follow us to keep up with all the goodies on the way
This fabulous gift is a fabulous Template by HF-Projekte
You can get it Here

Steampunk Fall Kit
This fabulous gift is a fabulous Template by HF-Projekte
You can get it Here
Steampunk Fall Kit


We are a brand new online blog magazine dedicated to designers across the world.
There will be four issues each year introducing featured stores and designers and introducing new talent in the scrapping world.
We will have different features each quarterly issue with helpful tutorials, latest crazes and interviews with featured designers and artists.
There will be opportunities to take up sponsorship and advertising with us too!
Very competitive prices to suit all budgets.
Publications will be:
1st September
1st December
1st March
1st June
if you are interested in any of the advertising or sponsorship, check out our prices page and see what we have to suit you.
Hybrid Crafting - Pocket Blessings
Pocket Blessings
Pocket Blessings are mini cards that are small enough to put in a purse, wallet or pocket. They can be stuck on a fridge with magnets and can easily be sent through the post.
You can give one card, or if you like make a whole set with matching backs and tie them together with a pretty ribbon for a larger gift.

Set-up your page to the same size as the card-stock you will be printing on (A4 for me).
Most printers have a margin where it doesn't print anything. Check your printer settings and place guidelines at the margin points (.6 cm for me).
Create guidelines to divide your page into a grid with each section approx 3.5 x 2.5 inches.
If your software does not support guidelines then draw horizontal and vertical lines in the top layer.

Arrange digital papers, embellishments, photos and word art in each section of the page.
For the example card above I used one of my husband’s photos and a quotation from the bible.
For the next step
Either
· Print on to the back of patterned card stock from your paper crafting stash
Or
· Print on to white card stock
· Turn the card stock over and print a sheet of digital paper onto the back
Or
· Print on to white card stock
· Stick a sheet of patterned paper or wrapping paper etc to the back with a stick glue or similar adhesive. (I did this for the example card shown above.)
· Leave to dry
Cut out the cards
(Optional: round the corners with a corner punch for a more professional finish)
Finishing Touches
For single cards you could do any of the following:
- Laminate it for extra durability
- Stick a magnet on the back
- Attach to a greetings card with string or ribbon so it can be removed by the
- Recipient as well as add decoration to the card
For packs of cards you could do any of the following:
- Tie them together with ribbon
- Cover a card box with coordinating paper to put them in
· Make a matching box to put them in
Digital Scrapbooking Layout
This is a step by step walk through on how I put this digital scrapbooking layout together. If you have a go at following this, let me know so I can come and admire your layout.
Here's my layout. I used the Peaceful Seas Digital Scrapbooking kit by Toucan Scraps.

Choose your background card-stock or digi-paper
I'm using my favourite page size - 10 x 8 inches. You go with your own preference.
Choose a second sheet of paper and place a wide strip along the left hand edge - to just under 1/3 of the width.

Choose your main photo and lay it to the bottom left. This is one of my husband.

Choose 3 extra photos. They could be close-ups or action shots to tell the story or add to the theme of your layout. Mine are action shots in sequence. Crop them to circles and lay them down the right hand edge.

To make the photos stand out we are going to mount them. Choose some card-stock/digi-paper and crop it to a little larger than all the photos.

Choose some note paper, or crop a sheet of paper to a rectangle.
This is for the journaling and will be tucked under the main photo at an angle.
Play for a bit until you get the angle how you like it.

Add a drop shadow to everything.
(I like to use opacity 50%, blur 2, distance 1.5, angle 135 for papers and photos.)
Add your journaling. Don’t use black for your font, it doesn't look natural.
Instead, use your colour picker tool and take the darkest colour from your layout/photos and use that.

Add a title to the top left hand side. I have cut letters out of the blue paper.

And now for the final touches. Some embellishments.
I've added some shells to the bottom left to add some balance,
and another shell with a bit of ribbon to link the note paper and right hand photos.

Add drop shadows to your elements, a little larger than for the paper but not too much.
Subscribe to:
Posts (Atom)